Contents
Learn to Whiten Teeth in Photoshop
Ok, so whether you’re a professional designer / photographer, or you’re just looking to clean up a few photos of yours that are showcasing your perfectly coffee stained teeth, this tutorial is for you.
There are a few different ways to go about doing this, so we’ll cover the most popular ones, and of course the quickest ones. Ain’t nobody got time to be sitting around for hours editing teeth.
Without further delay, let’s get into today’s toothy tutorial! (the alliteration on that just sounds magnificent doesn’t it?) Let’s learn how to whiten teeth in Photoshop!
How to whiten teeth in photoshop
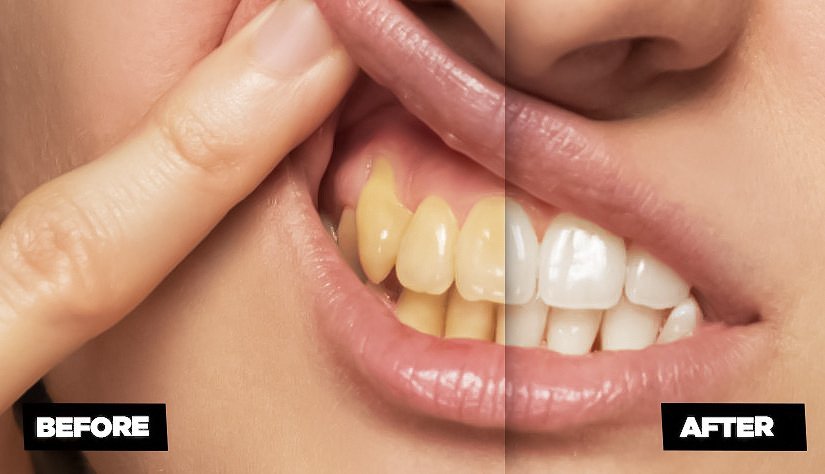
The image above is what we will be creating today. If you’re thinking, wow, that’s magic! Well really, it’s not. It’s so simple honestly even for a beginner, and i’ll try to make it simple in this tutorial for you.
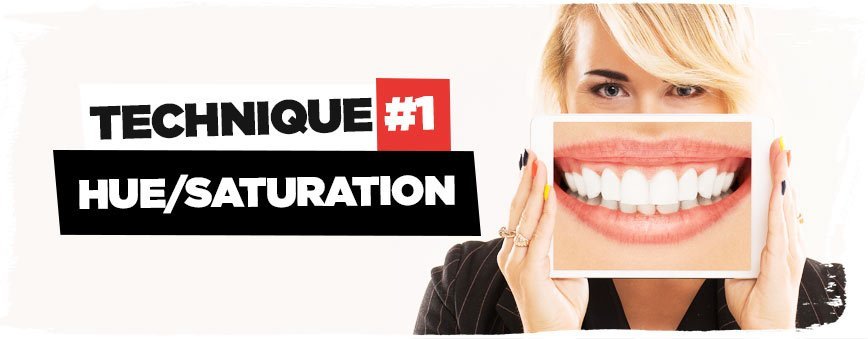
Without further delay, let’s start out with our first technique, changing the colour of the teeth with a simple adjustment of the Hue/Saturation levels.
#1 Hue/Saturation Technique.
Ok so let’s start off with this technique, this is typically how I would approach this task in Photoshop
Step 1:
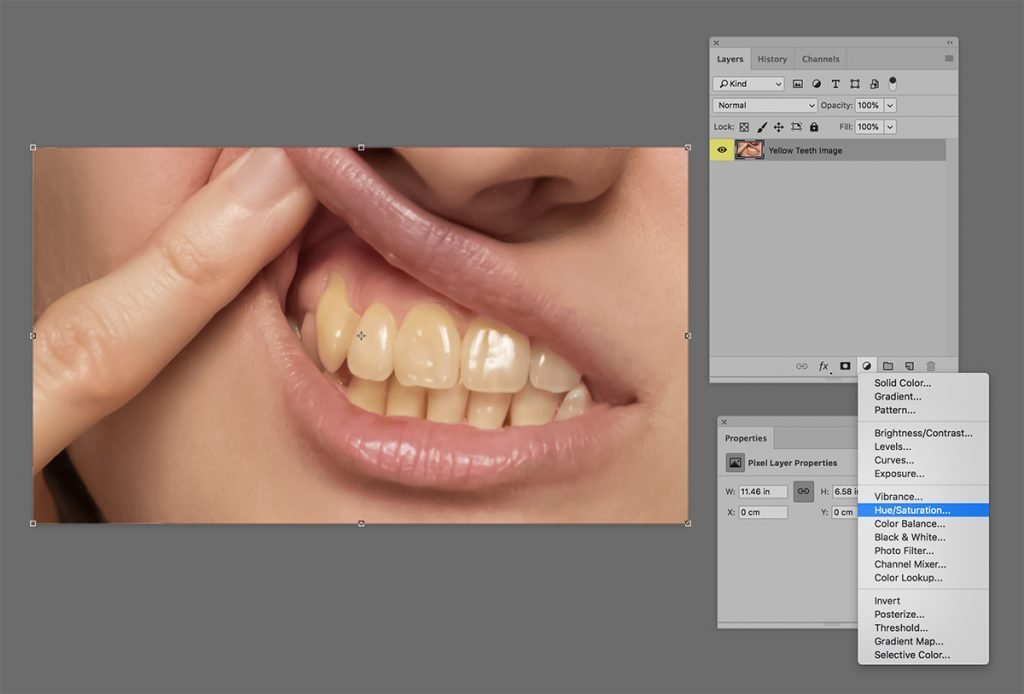
Let’s get the image that we want to improve, in this case it’s a female who’s had a little too much coffee and/or smoked too many cigarettes over the years, now let’s see what we can do to give her a pair of pearly whites!
Open your file in Photoshop and make sure your layer’s palette is open, select the layer and then go to the bottom of the layer’s palette and click on New Adjustment Layer > Hue / Saturation:
Step 2:
From here you’ll want to look in your Hue / Saturation panel, and click on the hand icon, this will open up the eyedropper tool, and what you need to do is click on the yellow part of the teeth that we are trying to change in this tutorial.
See the image below:

Step 3:
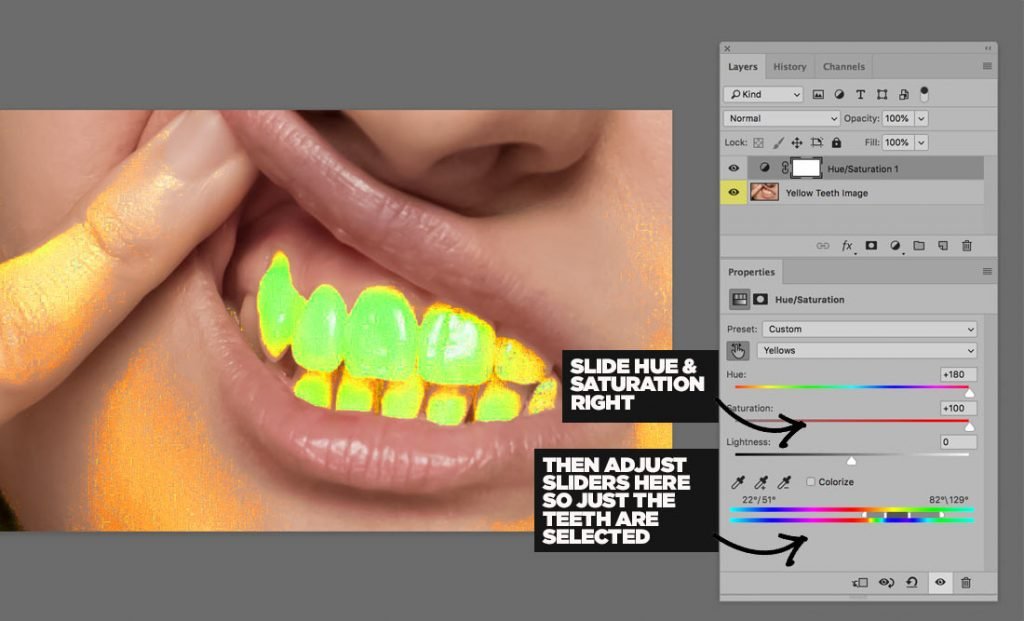
Now in order to “select” the teeth, you’ll want to push the Hue / Saturation sliders to the right.
Now you’ll see your image looks a bit harsh, with all the different levels showing up the colours. This is normal do don’t worry if it looks bad now. From here simply drag the sliders on the rgba slider at the bottom of the Hue/Saturation Palette, and adjust it so that only your teeth are selected.
It’s ok if there are some areas around the teeth that are also selected, we’ll deal with that with a Layer Mask later in the tutorial. Anyway, you should end up with something similar to this image below:
Step 4:
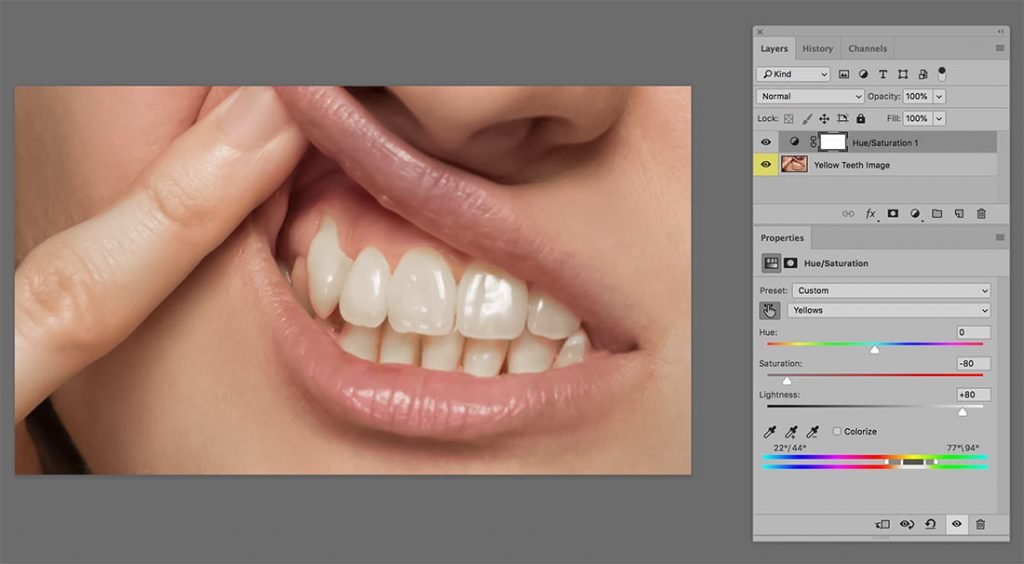
Once you have your teeth selected (roughly) like in the image above, now the magic part happens. Simply drag your Hue back to 0, then here’s the trick, drag the saturation level down to -80, or whatever looks good, and you’ll see you “suck” the saturation right out of the teeth.
If this isn’t white enough for you, then simply increase the lightness in the same panel, and you’ll see a lovely pair of pearly whites!
Step 5: Clean up Artefacts
Ok so as you can see, we’ve achieved what we set out to do, but how about the other areas of our images that were affected? Namely some of the areas of skin, well luckily when we set up the Hue/Saturation Adjustment Layer, Photoshop added in a lovely Layer Mask for us to edit!
Simply click on the layer mask, then grab yourself a Black Brush, and paint over the areas that were affected to remove them, making sure that only the teeth are still affected by the adjustment layer:
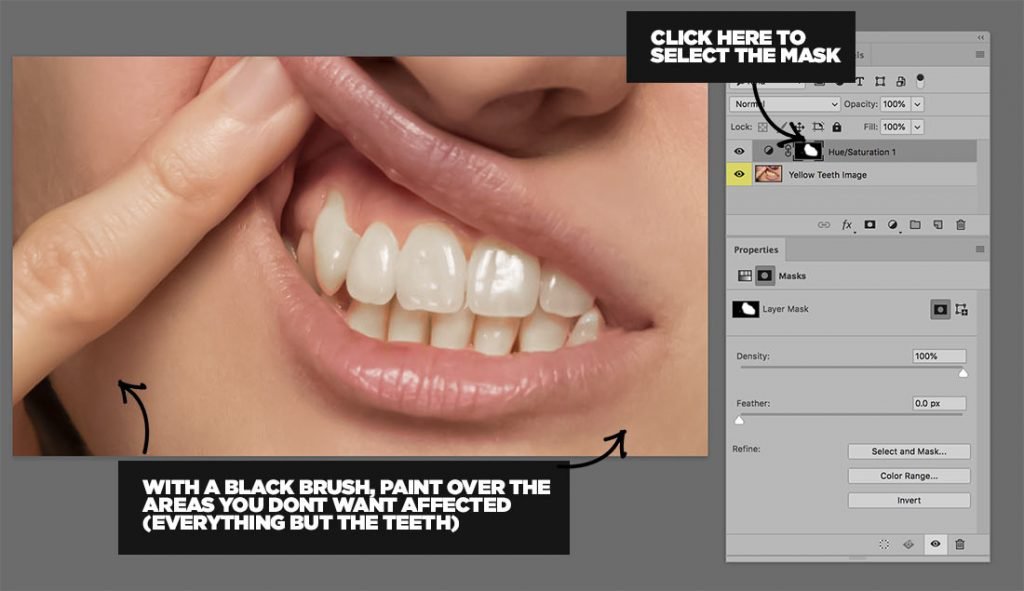
There we have it! A perfectly edited photo that just focuses on changing the yellow from the teeth. Now we have a perfect set of pearly whites!
#2 Lasso Tool & Hue/Saturation
Ok so this next technique is somewhat similar to the first technique in terms of reducing the saturation/increasing lightness. However, it’s just overall a little quicker, maybe for some “dirtier” edits shall we say. Definitely one of my favourite techniques when considering how to whiten teeth in photoshop.
Step 1:
What you’ll want to do is firstly open up your image, then grab the lasso tool (L on the Keyboard). From here, simply draw a crude selection around those dirty teeth.
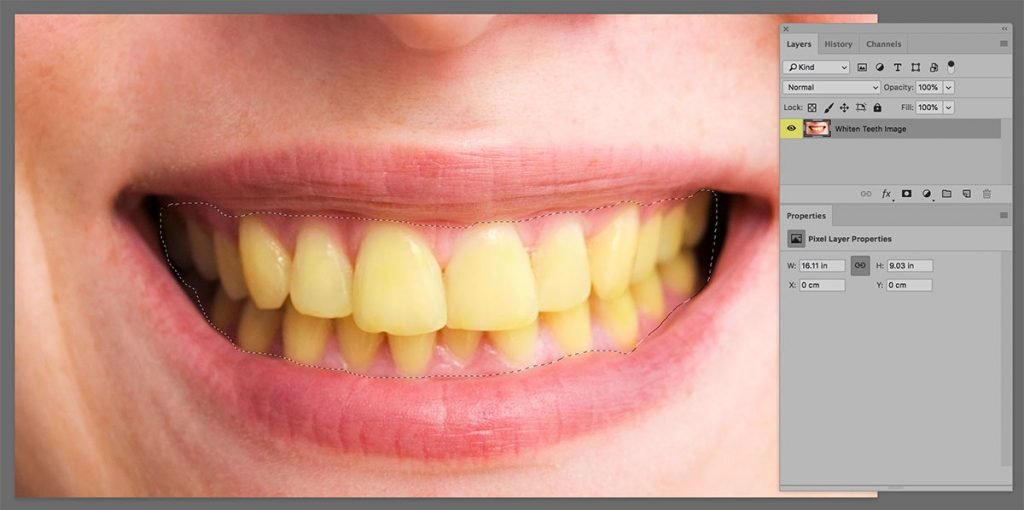
Step 2:
Now you’ve done this, simply go to your Layers Palette again and create a New Hue/Saturation Adjustment layer.
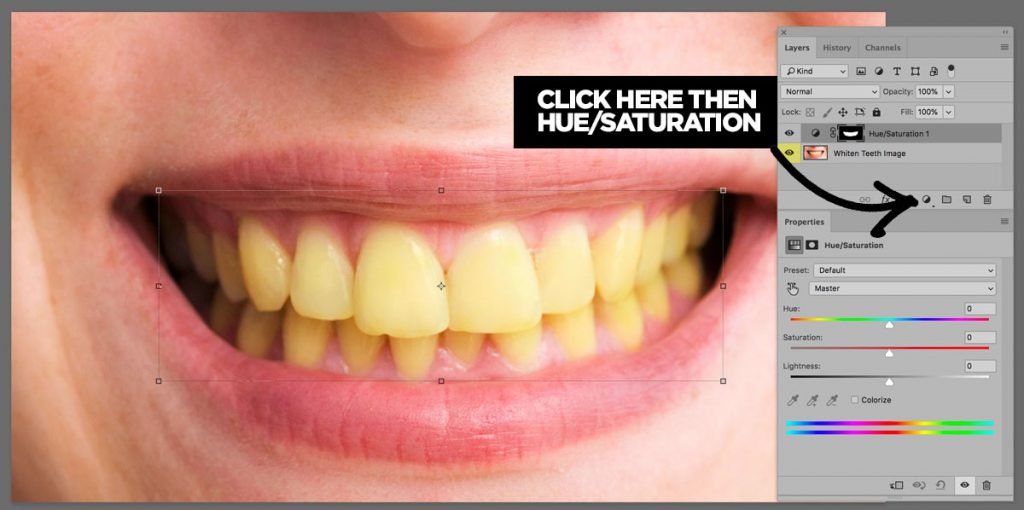
From here you’ll want to click on the “Hand” Icon next to “master”, then select a yellow part of your teeth (exactly the same as in the first part of this tutorial), then from here we’ll adjust hue/saturation.
Step 3:
The next step is similar to the first part of this tutorial, what you want to do is significantly reduce the saturation depending on your image, a rough guideline of anywhere between -60 to -80 should suffice, but it really depends on your image. On some images if you push the saturation too low then the teeth will just look grey, and a bit weird.
Not only this, but you’ll need to increase the lightness like before too, for this image I chose the following settings to achieve the pearly whiteness! -65 Saturation and +60 Lightness, after selecting the yellows in the teeth (dont forget this part!)

There we have it! A lovely set of pearly white teeth made in Adobe Photoshop. I personally like this technique as it gives me a more direct selection, so there’s often no need to mask out the other areas affected by the change in hue/saturation.
#3 Sponge & Dodge

I think when i first started learning about how to whiten teeth in photoshop, this was the first technique someone taught me…
It’s not one i would really suggest using, but it gets the job done, and if you’re careful with your mouse/tablet, you can get a pretty good result in half the time of the other techniques. But if you’re a bit twitchy with the mouse then this technique may produce a slightly uneven result.
Step 1:
However, for the sake of this tutorial, I’ll show you how its done. Simply grab the image you want, and then select the Sponge Tool (O on the Keyboard). If you’re thinking, “I pressed O but nothing came up, just the dodge tool”; Well the Dodge Tool and Sponge Tool are in the same toolset together. If Dodge comes up then simply right click on it in the toolbar (or press & hold) then switch the to the Sponge Tool. It’s not hard to miss, it literally looks like a Sponge!
Step 2:
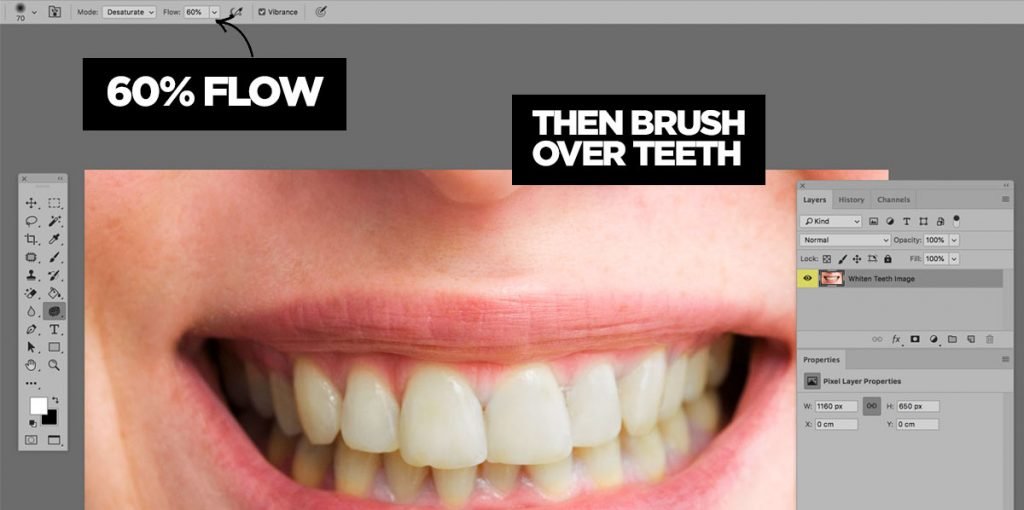
From here, we’re going to brush over the white parts of our teeth, making sure to keep the mouse button pressed down as not to start the dodge again, otherwise we’ll have multiple “layers” of Dodge, creating uneven results. You’ll want to reduce the “flow” a little here, so that you don’t create a result that’s too drastic, let’s go for 60% Flow.
Step 3:
From here all you’d need to do is simply use the Dodge Tool (O) to increase the lightness slightly, but as we haven’t adjusted the hue / saturation, what you need to do is just use the Dodge on the Midtones around 8% and you’ll get the image below! Quick and easy eh?
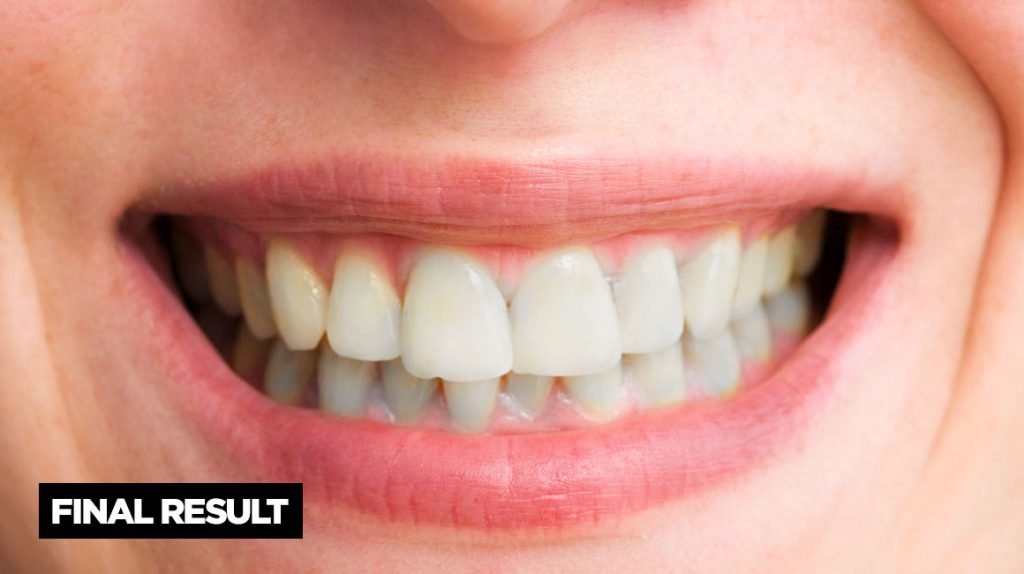
There we have it, 3 ways how to Whiten Teeth in Photoshop.
Questions & Answers
What version of Photoshop do I need?
These techniques use a lot of the core tools from way back in the day, aka: Old School Photoshop stuff! If you’re learning how to whiten teeth in photoshop, then you can pretty much use any version of Photoshop to do this, even Photoshop elements, as they both possess the tools to let you whiten those grimy teeth!
Photoshop isn’t sapping the Yellow from the teeth, help?
Ok, the main issue here will be that you haven’t colour picked the yellow from the teeth before adjusting the hue & saturation and of course the lightness. This means Photoshop will just adjust the general hue/saturation and not the yellows, not what you want! Make sure to colour pick the yellows, you are essentially telling photoshop: “Hey, modify this, sucker!”
How to whiten teeth in photoshop elements
These techniques will work in photoshop elements just as they do in Photoshop, just make sure you obviously aren’t using a ridiculously old version of elements. The hue/saturation / lasso tool / spong/dodge are pretty much in most photo editing applications and software nowadays, let alone just Adobe products, so have no fear, you can make these edits in Photoshop Elements too!
How to whiten teeth in Photoshop Express
Ok, so I haven’t used Photoshop Express in a while, but if you’re using it, you’ll have to make sure you can make advanced selections. If you can only use the Sponge/Dodge tool then that’s fine too, it may just mean you need to experiment a bit more and be a bit more careful with your editing!
Is there a photoshop whiten teeth action?
There are a few Photoshop Teeth Whitening actions if you look on GraphicRiver for example, but honestly by the time you’ve bought the plugin, installed it, and applied it to your image, you could have skimmed over this tutorial for a few minutes and just employed some of the quick techniques i’ve taught you to achieve the same thing without spending a penny on plugins or actions.
how to whiten teeth and eyes in photoshop?
Ok so this is one for another tutorial, but as a quick piece of advice here, you’ll generally want to employ the same techniques to whiten eyes in Photoshop. If you are editing an eyeball which is particularly yellow or perhaps a bit pink/bloodshot, you can select the colour with the same techniques and desaturate it followed by lightening it up a tough.
Obviously teeth are going to be more yellow than eyes so in actual fact teeth are more difficult to edit, but with eyes you have all the tiny blood vessels and maybe other abnormalities that you need to edit; however, stick to the techniques in this tutorial and you’ll be fine!
Conclusion
Well there we have it, 3 of the best ways on how to whiten teeth in photoshop. I hope you learned something valuable today. Please stay subscribed to Layerform and check back regularly for updated tutorials, content, products and much more! Thank you :DDD


Leave a Reply
You must be logged in to post a comment.